
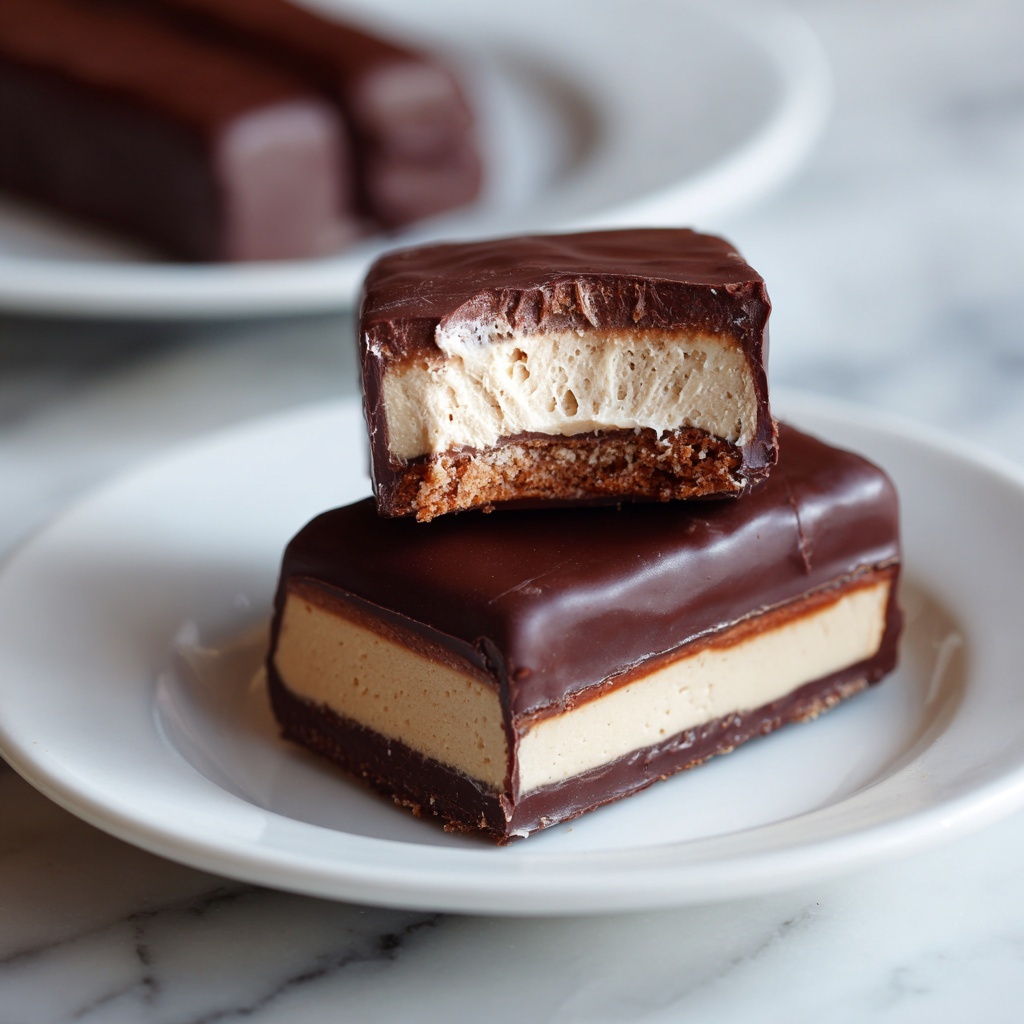
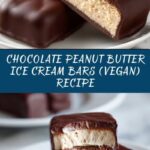
If you have a soft spot for the classic combo of chocolate and peanut butter but want to keep things light, refreshing, and totally plant-based, the Chocolate Peanut Butter Ice Cream Bars (Vegan) Recipe is nothing short of a revelation. Imagine creamy, dreamy coconut milk paired with luscious peanut butter, gently sweetened with maple syrup, and all coated in a glossy layer of rich dairy-free chocolate. This no-bake frozen treat will quickly become your go-to dessert for beating the heat or satisfying those sweet cravings with a wholesome twist.
Ingredients You’ll Need
This recipe is all about simple, high-quality ingredients that come together effortlessly to create something truly indulgent yet nourishing. Each element plays a vital role in balancing flavor, creaminess, and texture, resulting in bars that are as delightful to eat as they are easy to prepare.
- 1 ½ cups full-fat coconut milk: Provides a creamy, smooth base rich in fat for that perfect ice cream-like texture.
- ½ cup creamy natural peanut butter: Infuses the bars with deep, nutty flavor and a luscious, velvety mouthfeel.
- ¼ cup maple syrup: Adds natural sweetness with subtle caramel notes to complement the peanut butter and chocolate.
- 1 teaspoon vanilla extract: Enhances overall flavor with delicate warmth and depth.
- 1 ½ cups dairy-free chocolate chips: Creates a luscious coating that hardens into a crisp shell, adding texture contrast.
- 1 tablespoon coconut oil: Helps melt the chocolate smoothly and solidifies it nicely on the bars.
- ¼ cup crushed peanuts (optional for topping): Adds a satisfying crunch and extra nuttiness if you want to take your bars to the next level.
How to Make Chocolate Peanut Butter Ice Cream Bars (Vegan) Recipe
Step 1: Prepare Your Pan
Start by lining a loaf pan or square baking dish with parchment paper. This simple step makes it super easy to lift out the frozen base later without any mess. The parchment ensures your bars maintain their shape and makes cutting them a breeze.
Step 2: Blend the Base
Pour the full-fat coconut milk, creamy peanut butter, maple syrup, and vanilla extract into a blender. Blend everything on high until the mixture is silky smooth and perfectly combined. This step is crucial for a creamy texture with no lumps, setting the stage for an absolutely luscious ice cream bar.
Step 3: Freeze the Base
Pour the blended mixture into the prepared pan and smooth the surface with a spatula. Pop it in the freezer for at least 4 hours, or until it is completely firm. This waiting time builds the ice cream bar’s dense, satisfying texture that melts just right when you take that first bite.
Step 4: Melt the Chocolate Coating
Once the base is frozen solid, melt the dairy-free chocolate chips along with the coconut oil in a microwave-safe bowl. Do this in 30-second increments, stirring between each, until the chocolate is glossy and smooth. This smooth coating will become your bars’ irresistible crunchy shell.
Step 5: Dip and Decorate
Lift the frozen base out of the pan using the parchment paper and slice it into 8 bars. Dip each bar into your melted chocolate, ensuring it’s fully coated. Place them on a parchment-lined tray and, if you like, sprinkle the crushed peanuts on top for extra crunch. Freeze again for 10-15 minutes so the chocolate can set perfectly.
Step 6: Serve and Enjoy
Your Chocolate Peanut Butter Ice Cream Bars (Vegan) Recipe is ready to enjoy straight from the freezer. These bars offer a cool, creamy, slightly crunchy treat that’s perfect for any occasion.
How to Serve Chocolate Peanut Butter Ice Cream Bars (Vegan) Recipe

Garnishes
A sprinkle of crushed peanuts is always a welcome touch for that extra texture and nutty flavor. Alternatively, you could drizzle some melted peanut butter or dairy-free caramel sauce on top for a decadent finish that makes these bars look as amazing as they taste.
Side Dishes
While these bars are fantastic on their own, they also pair beautifully with fresh berries or a dollop of coconut whipped cream for a light, refreshing contrast. If you’re in the mood for a little coffee, serving them alongside a chilled espresso or cold brew can make the experience even more indulgent.
Creative Ways to Present
For a party, arrange the bars on a decorative platter with a scattering of edible flowers or chocolate shavings. You can also serve them in colorful cupcake liners to make them easier to hand out and add a fun pop of color. These bars make for an unforgettable treat that feels just as special as a gourmet dessert.
Make Ahead and Storage
Storing Leftovers
The best part about the Chocolate Peanut Butter Ice Cream Bars (Vegan) Recipe is how well they keep. Store any leftovers in an airtight container in the freezer for up to two weeks. This way, your indulgent treat is always ready when you are—to satisfy sudden cravings without any extra effort.
Freezing
These bars freeze beautifully. Whether you want to make a double batch or keep some on hand, the texture and flavor stay intact after freezing. Just make sure they are well wrapped or sealed to prevent freezer burn and maintain that perfect creamy consistency.
Reheating
Since these are frozen treats, reheating isn’t necessary or recommended. If the bars become too hard after extended freezing, leave them out for 5 minutes before you dig in—their sweetness and softness will gently re-emerge, making each bite just right.
FAQs
Can I use crunchy peanut butter instead of creamy?
Using crunchy peanut butter will add some texture to the base, which can be delightful, but it may affect the smoothness of the bars. If you love a bit of crunch, go for it, but creamy peanut butter generally gives the best consistency.
What if I don’t have full-fat coconut milk?
Full-fat coconut milk is key for the creamy texture in these bars. Using a lighter version might result in icier, less creamy bars. For best results, opt for full-fat and shake the can well before measuring.
Can I substitute maple syrup with another sweetener?
Absolutely! Agave nectar, brown rice syrup, or even a simple homemade date syrup can work fine. Just keep in mind that these alternatives may slightly change the flavor profile or sweetness level.
Is it necessary to use coconut oil when melting the chocolate?
Coconut oil helps create a smooth, glossy chocolate coating that hardens well. Without it, the chocolate might be thicker and less shiny. If you don’t have coconut oil, a small amount of another neutral oil can work, but coconut oil is preferred for flavor and texture.
Can I add other mix-ins to the base before freezing?
Definitely! Chopped peanuts, mini vegan chocolate chips, or even coconut flakes can be gently folded into the base before freezing for extra texture and flavor variations. Just make sure not to overload so the bars still freeze solid.
Final Thoughts
There’s something truly special about the Chocolate Peanut Butter Ice Cream Bars (Vegan) Recipe. It’s a perfect blend of rich, creamy, and crunchy that makes every bite an absolute joy without any of the guilt. Whether you’re vegan, dairy-free, or just looking for a delicious frozen treat, these bars show that simple ingredients can create extraordinary flavors. I can’t wait for you to try this recipe and see just how satisfying homemade vegan desserts can be!
Print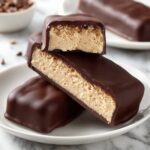
Chocolate Peanut Butter Ice Cream Bars (Vegan) Recipe
- Prep Time: 15 minutes
- Cook Time: 0 minutes
- Total Time: 4 hours 15 minutes
- Yield: 8 bars
- Category: Dessert
- Method: Freezer
- Cuisine: American
- Diet: Vegan
Description
Deliciously creamy and rich Chocolate Peanut Butter Ice Cream Bars made with vegan and dairy-free ingredients. These frozen treats combine the smoothness of coconut milk and peanut butter with a decadent chocolate coating, perfect for a healthy, indulgent dessert.
Ingredients
Ice Cream Base
- 1 ½ cups full-fat coconut milk
- ½ cup creamy natural peanut butter
- ¼ cup maple syrup
- 1 teaspoon vanilla extract
Chocolate Coating
- 1 ½ cups dairy-free chocolate chips
- 1 tablespoon coconut oil
Topping (Optional)
- ¼ cup crushed peanuts
Instructions
- Prepare the Pan: Line a loaf pan or square baking dish with parchment paper to ensure easy removal of the ice cream bars once frozen.
- Make the Ice Cream Base: In a blender, combine the coconut milk, peanut butter, maple syrup, and vanilla extract. Blend until the mixture is smooth and creamy, creating the base for your ice cream bars.
- Freeze the Base: Pour the blended mixture into the prepared pan, smoothing the top evenly. Freeze for at least 4 hours, or until the ice cream base is firm and set.
- Cut into Bars: Once fully frozen, lift the ice cream slab out of the pan using the parchment paper and carefully cut into individual bars.
- Melt the Chocolate Coating: In a microwave-safe bowl, melt the dairy-free chocolate chips together with the coconut oil. Heat in 30-second intervals, stirring between each until the mixture is smooth and glossy.
- Dip Bars in Chocolate: Quickly dip each frozen ice cream bar into the melted chocolate, ensuring it is fully coated. Place the coated bars on a parchment-lined tray.
- Add Toppings (Optional): Sprinkle crushed peanuts over the chocolate-coated bars for added crunch and flavor, if desired.
- Set the Chocolate: Return the coated bars to the freezer for 10–15 minutes or until the chocolate shell hardens completely.
- Serve: Keep the bars frozen and enjoy them straight from the freezer as a refreshing and healthy vegan dessert.
Notes
- For added texture, swirl in chopped peanuts or mini chocolate chips into the ice cream mixture before freezing.
- Store these bars in an airtight container in the freezer for up to 2 weeks to maintain freshness.


