
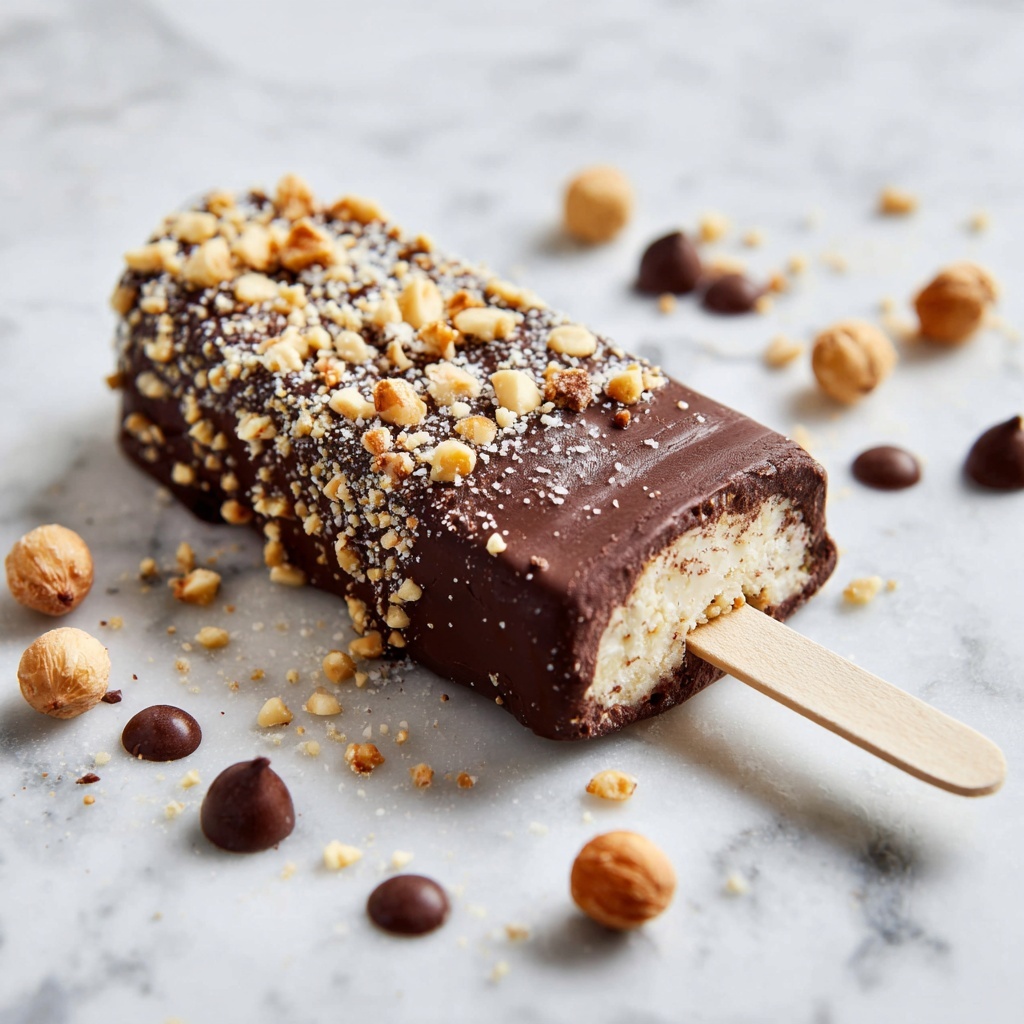
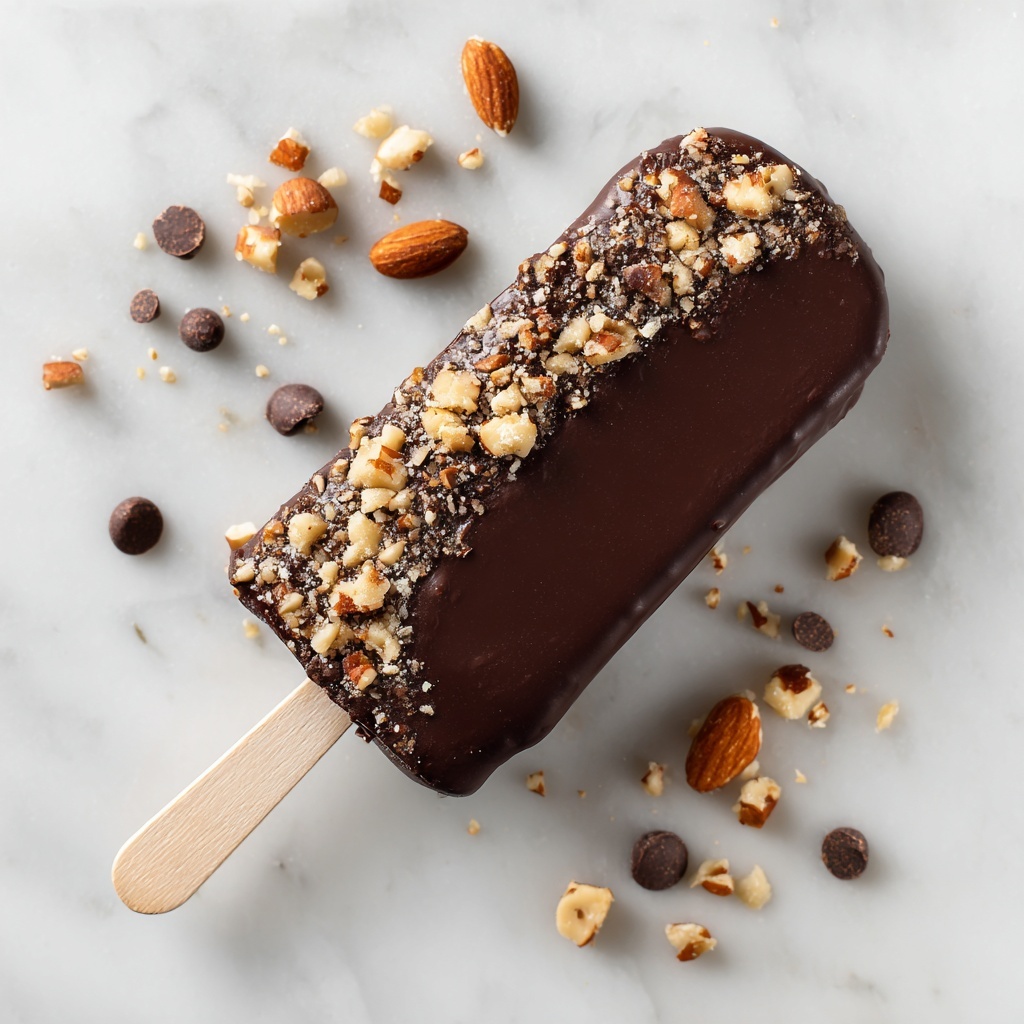
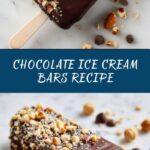
If you are craving a luscious frozen treat that blends rich chocolatey goodness with creamy smoothness, you cannot miss this Chocolate Ice Cream Bars Recipe. These homemade ice cream bars pack a delightful punch of cocoa and a satisfying crunch when coated with a glossy chocolate shell. Perfect for warm days or any moment you want a decadent dessert, they are simple to make yet impressive in taste. From the first bite, the velvety texture and intense chocolate flavor will have you reaching for another bar before you know it.
Ingredients You’ll Need
Gathering simple, quality ingredients is key to recreating the magic of this Chocolate Ice Cream Bars Recipe. Each brings essential flavor, creaminess, or texture that builds the perfect frozen indulgence.
- Heavy cream: Provides the rich creaminess essential for that smooth, velvety ice cream texture.
- Whole milk: Lightens the mixture slightly while keeping it creamy and balanced.
- Granulated sugar: Sweetens the base, enhancing the chocolate flavor without overpowering it.
- Unsweetened cocoa powder: Imparts deep, intense chocolate flavor and the signature dark color.
- Vanilla extract: Adds warmth and complexity, rounding out the chocolate aromas beautifully.
- Salt: Elevates all the flavors, ensuring the chocolate tastes rich rather than flat.
- Semi-sweet chocolate chips: Perfect for melting into a silky coating that hardens around the ice cream.
- Coconut oil: Helps the chocolate coating melt smoothly and harden crisply when frozen.
- Wooden sticks: Essential for holding your ice cream bars confidently while enjoying.
- Optional toppings: Think chopped nuts, sprinkles, or crushed cookies for added texture and visual flair.
How to Make Chocolate Ice Cream Bars Recipe
Step 1: Prepare the Creamy Chocolate Base
Start by whisking together the heavy cream, whole milk, granulated sugar, unsweetened cocoa powder, vanilla extract, and a pinch of salt in a medium saucepan. Gently heat the mixture over medium heat, stirring frequently to dissolve the sugar completely and marry the flavors. As the mixture warms, the cocoa powder blooms, making the house smell absolutely irresistible. Once everything is smooth and warm, remove it from heat and let it cool slightly.
Step 2: Freeze the Ice Cream Bars
Pour the cooled chocolate cream into popsicle molds, making sure to leave a little room at the top for expansion as it freezes. Insert wooden sticks securely in the center of each mold, then place them in the freezer for at least six hours or, better yet, overnight. This slow freeze ensures the bars set evenly, creating that perfect creamy texture you want in an ice cream bar.
Step 3: Make the Chocolate Coating
Once the bars are solid, it’s time to prepare the luscious chocolate shell. Melt the semi-sweet chocolate chips together with the coconut oil in a microwave-safe bowl or over a double boiler, stirring until silky smooth. The coconut oil adds a beautiful sheen and allows the coating to crisp up nicely when it refreezes.
Step 4: Dip and Decorate
Remove the frozen bars from their molds and quickly dip each one into the melted chocolate, ensuring it’s thoroughly coated. Let the excess drip off, then place the bars on a parchment-lined baking sheet. If you want to get fancy, sprinkle chopped nuts, sprinkles, or crushed cookies over the chocolate before it sets. Pop the coated bars back into the freezer for 15 to 20 minutes to harden the shell perfectly.
How to Serve Chocolate Ice Cream Bars Recipe
Garnishes
Simple garnishes can elevate your Chocolate Ice Cream Bars Recipe to the next level. Try a light dusting of cocoa powder or edible gold flakes for a touch of glam. Fresh mint leaves also add a refreshing contrast to the rich chocolate flavors. If you want a bit of crunch, a sprinkle of sea salt or chopped toasted almonds works wonders.
Side Dishes
While these bars are delicious on their own, pairing them with fresh berries or a warm fruit compote creates a delightful contrast of temperatures and flavors. If you’re serving for a party, consider a scoop of vanilla bean ice cream alongside or a small cup of espresso for adults to enhance the chocolate experience.
Creative Ways to Present
Presenting your Chocolate Ice Cream Bars Recipe with flair is fun and easy. Serve them on decorative plates with colorful napkins for a playful vibe, or place them upright in glass jars filled with sugar or sprinkles to show off their toppings. You can even drizzle a bit of caramel or raspberry sauce over the bars for an artistic touch that will make guests’ eyes light up.
Make Ahead and Storage
Storing Leftovers
If you find yourself with leftover bars, no worries! Store them in an airtight container or wrap each bar individually in plastic wrap, then place them in a freezer-safe bag to prevent freezer burn and preserve their flavor and texture.
Freezing
These bars freeze beautifully for up to two weeks, making them a fantastic make-ahead dessert option. When freezing, ensure they are well covered or contained so they won’t absorb any freezer odors or become icy.
Reheating
Since this is a frozen dessert, reheating isn’t necessary or recommended. Instead, simply let the bars sit at room temperature for a couple of minutes if they’re too hard from the freezer for the perfect bite.
FAQs
Can I use dark chocolate instead of semi-sweet chocolate chips?
Absolutely! Dark chocolate will provide a richer, slightly more bitter coating that pairs wonderfully with the sweet, creamy ice cream base. Feel free to experiment with different chocolate types to suit your taste.
Is there a dairy-free version of this Chocolate Ice Cream Bars Recipe?
Yes, you can substitute coconut milk for the heavy cream and whole milk, and use dairy-free chocolate for the coating. This swap keeps the bars creamy and delicious while accommodating lactose intolerance or vegan preferences.
How long do the bars need to freeze before dipping?
They should freeze for at least 6 hours or preferably overnight so that they’re completely solid. This ensures they hold up well when dipped in chocolate without melting too quickly.
What if I don’t have popsicle molds?
In a pinch, you can use small paper cups with wooden sticks or even silicone muffin liners. Just make sure to freeze the bars until firm enough to hold their shape before attempting to dip.
Can I add mix-ins like chocolate chips or nuts inside the ice cream base?
You can! Just fold in small amounts of chopped nuts or mini chocolate chips after the base has cooled but before freezing. Keep in mind these add-ins will create a slightly different texture in the bars.
Final Thoughts
If you’re looking for a dessert that’s as fun to make as it is to eat, this Chocolate Ice Cream Bars Recipe is a total winner. With its creamy texture, rich chocolate flavor, and satisfying crunch from the coating, it’s a treat that feels special yet simple. I promise once you try making these yourself, they’ll become a go-to for impressing friends or just indulging your own sweet tooth. So go ahead and start freezing, your perfect chocolate ice cream bar awaits!
Print
Chocolate Ice Cream Bars Recipe
- Prep Time: 15 minutes
- Cook Time: 5 minutes
- Total Time: 6 hours 20 minutes
- Yield: 8 bars
- Category: Dessert
- Method: Freezing
- Cuisine: American
- Diet: Vegetarian
Description
These homemade Chocolate Ice Cream Bars combine creamy, rich chocolate ice cream with a smooth, hard chocolate shell for a perfect frozen treat. Easy to make with simple ingredients, they are ideal for summer and can be customized with your favorite toppings.
Ingredients
Ice Cream Base
- 2 cups heavy cream
- 1 cup whole milk
- ¾ cup granulated sugar
- ¼ cup unsweetened cocoa powder
- 1 teaspoon vanilla extract
- ¼ teaspoon salt
Chocolate Coating
- 12 oz semi-sweet chocolate chips
- 2 tablespoons coconut oil
Other
- Wooden sticks
- Optional toppings (chopped nuts, sprinkles, crushed cookies)
Instructions
- Prepare the Ice Cream Mixture: In a medium saucepan, whisk together the heavy cream, whole milk, granulated sugar, cocoa powder, salt, and vanilla extract. Heat the mixture over medium heat, stirring frequently until it is warm and the sugar is completely dissolved. Remove from heat and let it cool slightly.
- Freeze in Molds: Pour the cooled mixture into popsicle molds, insert wooden sticks into each mold, and place them in the freezer for at least 6 hours or overnight until fully frozen.
- Melt the Chocolate Coating: Once the bars are frozen, melt the semi-sweet chocolate chips together with the coconut oil in a microwave-safe bowl in short bursts or using a double boiler, stirring frequently until smooth and glossy.
- Coat the Bars: Remove the frozen bars from the molds and quickly dip each bar into the melted chocolate. Allow any excess chocolate to drip off, then place the bars on a parchment-lined baking sheet. If desired, sprinkle with optional toppings while the chocolate is still wet.
- Set the Chocolate Shell: Return the coated bars to the freezer for 15 to 20 minutes to allow the chocolate shell to harden.
- Serve: Serve the chocolate ice cream bars directly from the freezer for a refreshing dessert treat.
Notes
- You can substitute the semi-sweet chocolate chips with dark or milk chocolate based on your preference.
- For a dairy-free version, use coconut milk in place of heavy cream and dairy-free chocolate chips for coating.
- Keep the bars frozen until ready to serve to maintain the texture and coating.

