Description
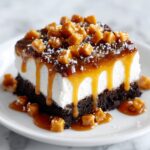
This Butterfinger Candy Bar Poke Cake is a decadent and easy-to-make dessert combining a moist chocolate cake soaked with a rich caramel and sweetened condensed milk mixture, topped with creamy whipped topping and crunchy crushed Butterfinger candy bars. Perfect for celebrations or satisfying a sweet tooth, it offers layers of chocolate, caramel, and peanuts in every bite.
Ingredients
Scale
Cake Ingredients
- 1 box chocolate cake mix (plus ingredients listed on the box)
Filling and Topping
- 1 (14 oz) can sweetened condensed milk
- 1 (12.25 oz) jar caramel sauce
- 1 (8 oz) tub whipped topping (thawed)
- 4 Butterfinger candy bars (crushed)
- ½ teaspoon vanilla extract (optional)
Instructions
- Prepare and Bake Cake: Preheat your oven and prepare the chocolate cake mix according to the package directions. Pour the batter into a 9×13-inch pan and bake until a toothpick inserted comes out clean. Once baked, allow the cake to cool for 5–10 minutes so it is warm but not hot.
- Poke Holes in Cake: Using the handle of a wooden spoon, gently poke holes all over the surface of the warm cake. These holes will allow the filling to soak deep into the cake, adding moisture and flavor.
- Make the Filling: In a small bowl, combine the sweetened condensed milk and caramel sauce; mix together until smooth and well blended. This mixture will infuse the cake with a sweet, creamy caramel flavor.
- Pour Filling Over Cake: Evenly pour the caramel-condensed milk mixture over the cake, allowing it to seep into the holes you poked earlier. This step ensures the cake stays moist and flavorful throughout.
- Cool Completely: Let the cake cool completely to room temperature to set the filling and avoid melting the topping.
- Add Whipped Topping: Spread the thawed whipped topping evenly over the surface of the cooled cake, creating a light and creamy layer.
- Sprinkle Crushed Butterfinger: Evenly sprinkle the crushed Butterfinger candy bars over the whipped topping for a crunchy, chocolatey peanut butter finish that contrasts beautifully with the softness below.
- Chill Before Serving: Refrigerate the cake for at least 2 hours to allow flavors to meld and the cake to set perfectly before slicing and serving.
Notes
- For extra Butterfinger flavor, stir half of the crushed candy bars into the whipped topping before spreading it on the cake.
- This cake can be made a day ahead and stored covered in the fridge, making it perfect for advance preparation.
- Use a sharp knife warmed in hot water to slice the cake for clean pieces.
- Try substituting peanut butter cups or other favorite candy bars for a variation.