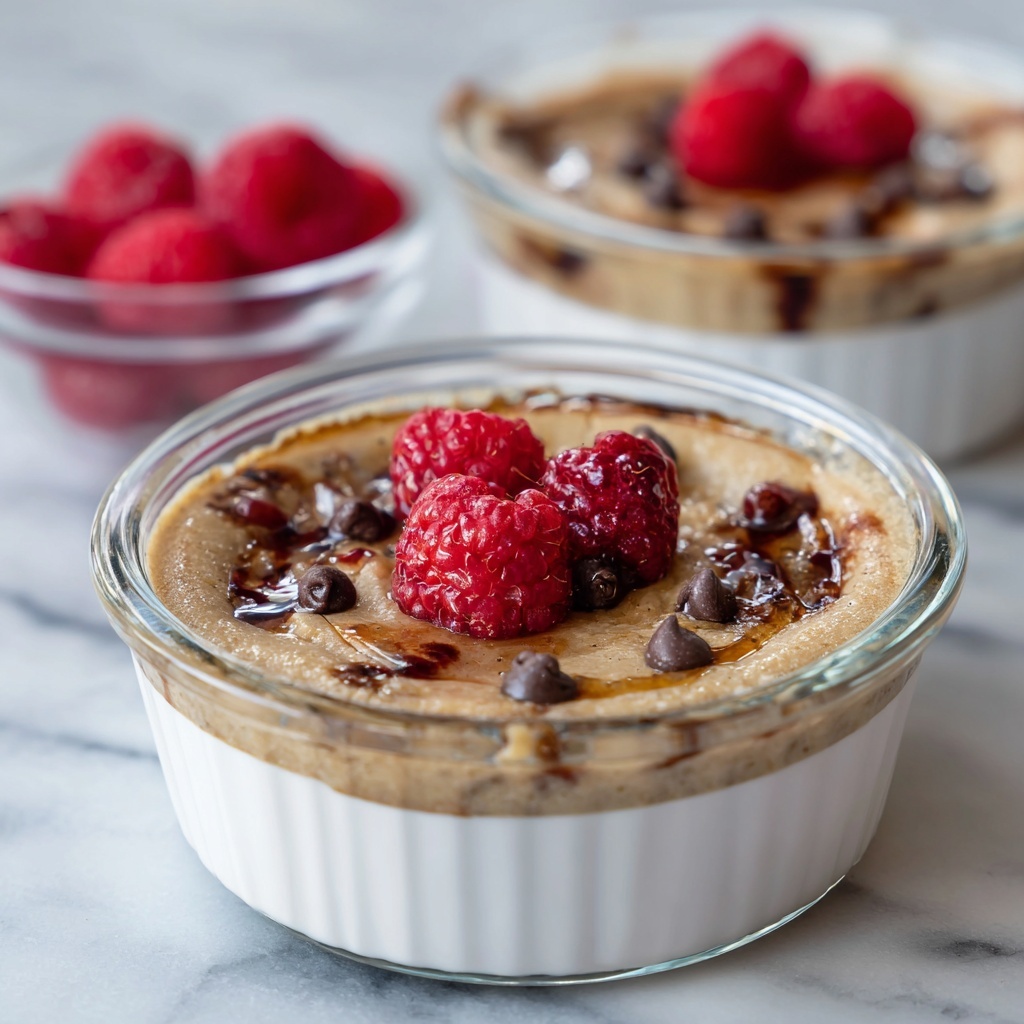
If you have been searching for a delicious and nourishing breakfast that feels like a treat yet fuels your day, this Baked Protein Pancake Bowls Recipe is an absolute game-changer. Imagine enjoying fluffy, protein-packed pancakes baked right in a bowl, combining the comfort of classic pancakes with the convenience of a grab-and-go meal. It’s not only easy on your morning routine but also customizable and deeply satisfying. Whether you want to kickstart your day with sustained energy or indulge in a wholesome snack, these baked pancake bowls are about to become your new favorite.

Ingredients You’ll Need
This recipe strikes the perfect balance between simplicity and nutrition. Each ingredient plays an important role, from adding structure and fluffiness to providing protein and subtle sweetness, bringing together a bowl that’s as tasty as it is good for you.
- 1/4 cup all-purpose flour: The base of your pancake, choose spelt, oat, gluten-free, or buckwheat to suit your preference and boost flavor.
- 1/4 cup protein powder: A premium addition like Caramelised White Chocolate protein powder adds richness and muscle-fueling power.
- 1/2 teaspoon baking powder: Helps your pancake bowl rise perfectly fluffy every time.
- 1 tablespoon sugar-free granulated sweetener: Sweetens without the extra calories; honey or maple syrup can be used for a natural option.
- 1 large egg: Binds everything beautifully while contributing to the fluffy texture.
- 1/4 cup high-protein vanilla Greek yogurt: Adds creaminess and tang, plus a protein punch—Yopro is a great choice here.
- 2 tablespoons soy milk: Any milk will do, but soy milk enhances smoothness and blends flavors seamlessly.
How to Make Baked Protein Pancake Bowls Recipe
Step 1: Preheat Your Oven
Before doing anything, set your oven to 350°F (180°C). Preheating is important to ensure that your pancake bowl bakes evenly and achieves that perfect golden color on the edges.
Step 2: Combine Dry Ingredients
In a spacious mixing bowl, whisk together the flour, protein powder, baking powder, and your chosen sweetener. This dry base creates the sturdy yet soft texture that holds your pancake bowl together.
Step 3: Whisk Wet Ingredients Separately
In a separate bowl, blend the egg, Greek yogurt, and soy milk until smooth. This mixture adds moisture and richness, making your pancake bowl irresistibly tender inside.
Step 4: Mix Wet and Dry Together
Pour the wet ingredients into the dry bowl and stir until you get a smooth batter. Avoid overmixing to keep your pancake light and fluffy.
Step 5: Add Optional Delicious Extras
If you want to jazz it up, gently fold in fresh berries or sugar-free chocolate chips now. These little bursts of flavor turn your protein pancake bowl into a luscious morning indulgence.
Step 6: Pour Batter and Bake
Transfer your batter into an oven-safe bowl or ramekin. Pop it into the preheated oven and bake for 20 to 22 minutes. The pancake is ready when the center is set and no longer jiggly.
Step 7: Cool and Refrigerate
Allow your pancake bowl to cool completely before placing it in the fridge. This step is important if you want to enjoy it later and keep it fresh for up to 3 to 4 days.
Step 8: Reheat and Enjoy
When you’re ready to dig in, microwave your pancake bowl for 40 to 60 seconds, then top with extra Greek yogurt or sugar-free maple syrup for a bonus flavor uplift.
How to Serve Baked Protein Pancake Bowls Recipe

Garnishes
Adding the right garnishes can elevate your pancake bowl from great to unforgettable. Fresh berries, a sprinkle of chia seeds, or a dollop of nut butter provide contrasting textures and flavors that make every bite exciting.
Side Dishes
Though the pancake bowl serves as a hearty meal on its own, pairing it with a crisp side salad or a smoothie packed with greens and fruits creates a balanced plate that satisfies hunger deeply and healthfully.
Creative Ways to Present
Try layering your baked protein pancake bowls with yogurt and granola in a parfait glass for a stunning breakfast presentation. Or, top with sliced bananas and a drizzle of sugar-free chocolate sauce to make it look just as good as it tastes.
Make Ahead and Storage
Storing Leftovers
If you make a batch of these baked protein pancake bowls, store leftover portions in airtight containers in your refrigerator. Properly stored, they stay fresh and delicious for up to 4 days, ready to nibble whenever hunger strikes.
Freezing
For longer storage, you can freeze individual pancakes in freezer-safe bags. Thaw overnight in the fridge or reheat gently in the microwave to keep texture and flavor intact.
Reheating
Microwaving is your friend here—heat your pancake bowl for 40 to 60 seconds until warm and soft. You can also heat it briefly in a toaster oven for a slightly crispier exterior, which adds a lovely contrast.
FAQs
Can I use different protein powders for this recipe?
Absolutely! The Baked Protein Pancake Bowls Recipe works well with whey, plant-based, or any preferred protein powder, though flavor and texture might vary slightly depending on your choice.
Is it possible to make this recipe vegan?
Yes! Substitute the egg with a flax or chia egg and replace Greek yogurt with a plant-based, high-protein alternative. Similarly, use your favorite plant milk to keep it vegan-friendly.
Can I add fruits directly to the batter?
Definitely! Fresh or frozen berries fold in beautifully and burst with flavor as they bake. Just be careful not to overload the batter to maintain a nice structure in your pancake bowl.
What’s the best way to prevent the pancake bowl from sticking?
Greasing your baking bowl or ramekin well with a little oil or non-stick spray helps the baked pancake slide out cleanly, making serving and cleaning easier.
How do I adjust the sweetness to my liking?
The recipe is flexible—use sugar-free sweeteners for less sugar, or natural options like maple syrup or honey if you prefer a sweeter breakfast. Taste your batter before baking to fine-tune sweetness.
Final Thoughts
This Baked Protein Pancake Bowls Recipe is a wonderful way to enjoy a comforting meal packed with nutrition and flavor without the fuss of traditional stove-top pancakes. It’s cozy, customizable, and energizing, perfect for busy mornings or anytime you crave something both wholesome and indulgent. I can’t wait for you to try it and see how it transforms your breakfast routine into something special.
Print
Baked Protein Pancake Bowls Recipe
- Prep Time: 10 minutes
- Cook Time: 22 minutes
- Total Time: 32 minutes
- Yield: 1 serving
- Category: Breakfast
- Method: Baking
- Cuisine: American
- Diet: Low Fat
Description
This Baked Protein Pancake Bowl is a nutritious, high-protein breakfast option that’s easy to prepare and perfect for meal prep. Made with a blend of flour and protein powder, Greek yogurt, and soy milk, it offers a balanced combination of carbs and protein. Baked in the oven until fluffy and set, it can be customized with fresh berries or sugar-free chocolate chips for added flavor. Ideal for those seeking a filling and healthy start to their day.
Ingredients
Dry Ingredients
- 1/4 cup all-purpose flour (or spelt, oat, gluten-free, or buckwheat flour)
- 1/4 cup protein powder (e.g., Caramelised White Chocolate Premium Protein from MacroMike)
- 1/2 teaspoon baking powder
- 1 tablespoon sugar-free granulated sweetener (or regular sugar, honey, or maple syrup)
Wet Ingredients
- 1 large egg
- 1/4 cup high-protein vanilla Greek yogurt (e.g., Yopro High Protein Vanilla Greek yogurt)
- 2 tablespoons soy milk (or any preferred milk)
Optional Add-ins
- Fresh berries (as desired)
- Sugar-free chocolate chips (as desired)
Instructions
- Preheat the oven: Preheat your oven to 350°F (180°C) to ensure it reaches the right temperature for baking your pancake bowl evenly.
- Mix dry ingredients: In a mixing bowl, combine the flour, protein powder, baking powder, and sweetener if you are using it. This creates the base of your batter.
- Whisk wet ingredients: In a separate bowl, whisk together the egg, high-protein vanilla Greek yogurt, and soy milk until smooth and well combined.
- Combine wet and dry mixtures: Pour the wet ingredients into the dry ingredients and stir together until the batter is smooth and free of lumps.
- Add optional mix-ins: If desired, gently fold in fresh berries or sugar-free chocolate chips to add extra flavor and texture to your pancake bowl.
- Bake the batter: Pour the batter into an oven-safe bowl or ramekin. Bake in the preheated oven for 20-22 minutes, or until the center is fully set and a toothpick inserted comes out clean.
- Cool and store: Let the pancake bowl cool completely to room temperature, then refrigerate. It can be stored for 3-4 days, making it perfect for meal prep.
- Reheat and serve: When ready to eat, reheat in the microwave for 40-60 seconds. Top with additional Greek yogurt or sugar-free maple syrup if desired for extra creaminess and sweetness.
Notes
- Use your choice of flour depending on dietary requirements: spelt, oat, gluten-free, or buckwheat all work well.
- Protein powder flavors can be varied to suit your taste preferences; caramelised white chocolate flavor gives a sweet undertone.
- Sugar-free sweeteners help reduce calories but regular sugar, honey, or maple syrup can be used if preferred.
- Adding fresh berries or sugar-free chocolate chips provides extra texture and flavor but is optional.
- Refrigerate leftovers to maintain freshness and make weekday mornings easier.
- Microwave reheating time may vary depending on your appliance’s power.


