
“`html
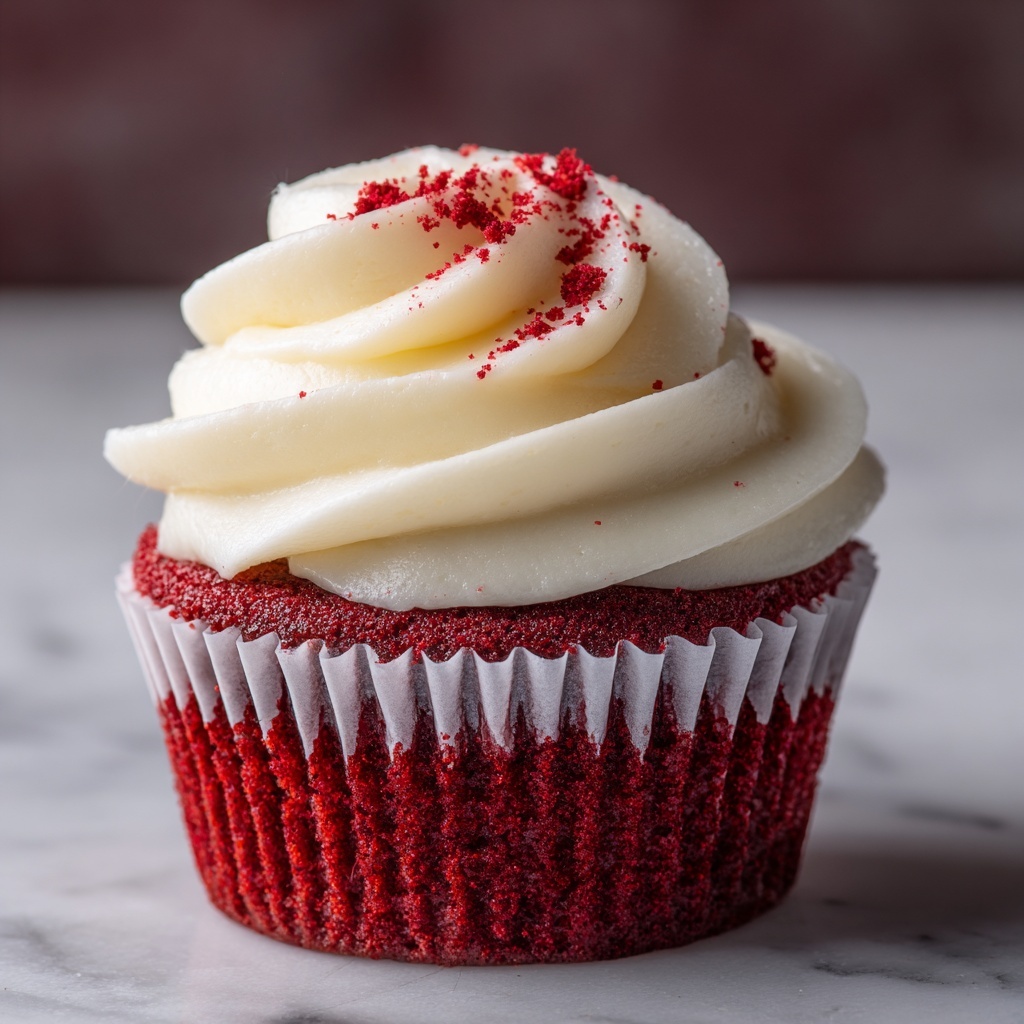
If you’re craving something that feels like a decadent dessert and a fun treat all rolled into one, you absolutely need to try this Red Velvet Cookie Cups with Cream Cheese Frosting Recipe. These charming little cups combine the rich, velvety flavor of classic red velvet with a soft, cakey cookie texture and are crowned with a luscious cream cheese frosting that will have your taste buds dancing with joy. Perfect for celebrations, cozy nights in, or whenever you want to surprise friends and family with a dessert that tastes as good as it looks, this recipe is sure to become a favorite in your baking repertoire.
Ingredients You’ll Need
Getting the perfect Red Velvet Cookie Cups with Cream Cheese Frosting Recipe starts with a handful of simple, yet essential ingredients. Each one plays a special role in delivering that signature flavor, velvety texture, and brilliant color that make these cookie cups irresistible.
- All-purpose flour: Provides the structure for the cookie cups, ensuring they’re tender but sturdy enough to hold their shape.
- Cocoa powder: Adds a subtle chocolate depth that complements the red velvet flavor beautifully.
- Baking soda: Helps the cookie cups rise slightly, creating a soft, cakey texture.
- Salt: Balances the sweetness and enhances the overall flavor.
- Unsalted butter: Gives richness and moisture to both the cookie cups and the frosting.
- Granulated sugar: Sweetens and helps create that tender crumb.
- Egg: Binds the ingredients and adds to the soft texture.
- Vanilla extract: Lifts the flavors with its warm, aromatic notes.
- Buttermilk: Adds a tangy flavor and keeps the cookie cups extra moist.
- Red food coloring: Turns these cookie cups into that signature vibrant red we all love in red velvet!
- White vinegar: Works with the baking soda to give the cookie cups a slight lift and accentuate the red velvet tang.
- Cream cheese: The star of the frosting, delivering that creamy tanginess that perfectly balances the sweet cookie base.
- Powdered sugar: Sweetens and thickens the frosting to spreadable, dreamy perfection.
- Pinch of salt: Just enough to enhance the frosting’s richness without overpowering it.
How to Make Red Velvet Cookie Cups with Cream Cheese Frosting Recipe
Step 1: Preheat the Oven and Prepare the Pan
Start by preheating your oven to 350°F (175°C) to get it nice and ready for baking. Lightly grease a mini muffin tin or line it with cupcake liners. This step ensures the cookie cups release easily once baked, keeping their perfect shape intact.
Step 2: Mix the Dry Ingredients
In a medium bowl, whisk together the all-purpose flour, cocoa powder, baking soda, and salt. This mixture will form the dry base of the cookie dough, infusing the right balance of cocoa flavor and leavening action to achieve that classic red velvet texture.
Step 3: Cream Butter and Sugar, Then Add Wet Ingredients
Using a large mixing bowl, beat the softened unsalted butter and granulated sugar together until the mixture is light and fluffy—about 2 to 3 minutes. This step is key because it adds air into the dough, making the cookie cups tender and moist. Next, mix in the egg, vanilla extract, and red food coloring until fully combined. Stir in the buttermilk and vinegar to bring in moisture and activate the leavening for a delicate crumb.
Step 4: Combine Wet and Dry Ingredients
Gradually add the dry ingredient mix to the wet ingredients, stirring just until combined. Be careful not to overmix here to keep the cookie cups soft instead of tough. The dough will be pleasantly soft and richly colored—a great sign you’re on the right track.
Step 5: Shape and Bake the Cookie Cups
Scoop about 1 tablespoon of cookie dough into each muffin cup, pressing down gently to form a cup shape with a slight hollow in the center. Bake for 8 to 10 minutes, or until a toothpick inserted into the center comes out clean. After removing from the oven, let the cookie cups cool in the pan for 5 minutes before transferring them to a wire rack to cool completely. This cooling period gives them time to firm up while staying tender.
Step 6: Make the Cream Cheese Frosting
In a large mixing bowl, beat the softened cream cheese and butter together until smooth and creamy. Then, gradually add the powdered sugar, vanilla extract, and a pinch of salt. Continue beating until the frosting is light, fluffy, and perfectly spreadable—usually 3 to 4 minutes. This frosting is what makes the Red Velvet Cookie Cups with Cream Cheese Frosting Recipe truly shine with its tangy sweetness.
Step 7: Assemble the Cookie Cups
Once the cookie cups have fully cooled, use a piping bag or a spoon to spread or pipe the luscious cream cheese frosting on top of each cup. Feel free to get creative by sprinkling with festive sprinkles or extra crumbs made from any leftover cookie dough baked separately. The frosting crowns these cookie cups to perfection!
How to Serve Red Velvet Cookie Cups with Cream Cheese Frosting Recipe

Garnishes
Add a festive touch with colorful sprinkles, mini chocolate chips, or a dusting of cocoa powder atop the cream cheese frosting. A few fresh raspberries or edible glitter can also elevate these treats for special occasions or holidays.
Side Dishes
Pair your Red Velvet Cookie Cups with a cold glass of milk, a warm cup of coffee, or a rich hot chocolate for a comforting experience. These bites also go wonderfully alongside fresh fruit salads or light whipped cream for a well-rounded dessert spread.
Creative Ways to Present
Serve these cookie cups on a pretty platter or individual dessert plates with a decorative doily underneath. For parties, use cupcake stands or tiered trays to showcase their beauty. You can even wrap individual cookie cups in clear cellophane tied with a ribbon, turning them into delightful edible gifts.
Make Ahead and Storage
Storing Leftovers
If you have any leftovers (which is rare, but it happens!), store the Red Velvet Cookie Cups with Cream Cheese Frosting Recipe in an airtight container in the refrigerator. They’ll stay fresh and tasty for up to 3 days, so feel free to enjoy them as a treat throughout the week.
Freezing
You can freeze the baked cookie cups without frosting. Once cooled, place them in a single layer on a baking sheet to freeze, then transfer to a freezer-safe container. When ready to use, thaw overnight in the refrigerator, then frost just before serving. The cream cheese frosting does not freeze well, so it’s best to frost them fresh.
Reheating
Warm the cookie cups gently in the microwave for 10 to 15 seconds if you prefer a slightly warm treat, but avoid overheating as it can soften the frosting too much. Enjoy the cream cheese frosting at room temperature for the best flavor.
FAQs
Can I use regular milk instead of buttermilk?
While regular milk can be used in a pinch, buttermilk adds a tangy flavor and helps with the texture of the cookie cups. To mimic buttermilk, you can add a teaspoon of vinegar or lemon juice to a cup of milk and let it sit for a few minutes before using.
Why is the vinegar added to the dough?
The white vinegar reacts with the baking soda to help the cookie cups rise and gives that classic red velvet tang that everyone loves. It’s a small but important ingredient to keep the flavor and texture just right.
Can I make these cookie cups without red food coloring?
Yes, but they won’t have the signature red velvet color that makes this recipe so visually striking. You could experiment with natural coloring options like beet juice, but results will vary.
What’s the best way to pipe the cream cheese frosting?
Use a piping bag fitted with a star or round tip for a beautiful, professional look. If you don’t have a piping bag, a resealable plastic bag with a tiny corner cut off works just as well.
How can I make sure the cookie cups don’t stick to the tin?
Greasing the mini muffin tin or using cupcake liners works wonders. If you’re using a metal tin, consider lightly dusting with flour after greasing for extra assurance that your cookie cups will come out cleanly.
Final Thoughts
I can honestly say that this Red Velvet Cookie Cups with Cream Cheese Frosting Recipe is one of those delightful treats that brings joy every time you bake it. Whether you’re sharing these at a party, gifting them to someone special, or simply savoring one with your afternoon coffee, they never fail to impress. Don’t hesitate—give this fun, festive recipe a try and watch how these little red velvet delights light up your kitchen and your heart.
“`
Print
Red Velvet Cookie Cups with Cream Cheese Frosting Recipe
- Prep Time: 10 minutes
- Cook Time: 10 minutes
- Total Time: 25 minutes
- Yield: 12 cookie cups
- Category: Dessert
- Method: Baking
- Cuisine: American
Description
Delight in these festive Red Velvet Cookie Cups topped with luscious cream cheese frosting. Perfectly soft, slightly tangy, and bursting with rich red velvet flavor, these mini cookie cups are ideal for parties, holidays, or any sweet craving. The recipe guides you through creating the cookie base, baking them in a mini muffin tin, and finishing with a creamy, fluffy cream cheese frosting for a decadent treat.
Ingredients
Cookie Dough
- 1 1/2 cups all-purpose flour
- 1 tbsp cocoa powder
- 1/2 tsp baking soda
- 1/4 tsp salt
- 1/2 cup unsalted butter, softened
- 1 cup granulated sugar
- 1 large egg
- 1 tsp vanilla extract
- 2 tbsp buttermilk
- 2 tbsp red food coloring
- 1/2 tsp white vinegar
Cream Cheese Frosting
- 8 oz cream cheese, softened
- 1/4 cup unsalted butter, softened
- 2 cups powdered sugar
- 1 tsp vanilla extract
- Pinch of salt
Instructions
- Preheat the Oven: Preheat your oven to 350°F (175°C) and prepare a mini muffin tin by greasing it or lining it with cupcake liners to prevent sticking.
- Make the Cookie Dough: In a medium bowl, whisk together the all-purpose flour, cocoa powder, baking soda, and salt; set aside. In a large mixing bowl, beat the softened butter and granulated sugar until light and fluffy, about 2-3 minutes. Add the egg, vanilla extract, and red food coloring; mix until combined. Stir in the buttermilk and white vinegar. Gradually add the dry ingredients, mixing gently until just combined to avoid overmixing.
- Shape the Cookie Cups: Scoop about 1 tablespoon of cookie dough into each muffin cup, pressing the dough down gently to form a cup shape. Bake in the preheated oven for 8-10 minutes, or until a toothpick inserted in the center comes out clean. Allow the cookie cups to cool in the pan for 5 minutes before transferring to a wire rack to cool completely.
- Make the Cream Cheese Frosting: In a large mixing bowl, beat together the softened cream cheese and butter until smooth and creamy. Add the powdered sugar, vanilla extract, and a pinch of salt. Beat everything together for about 3-4 minutes until the frosting is fluffy and light.
- Assemble the Cookie Cups: Once the cookie cups have cooled completely, use a piping bag or a spoon to spread or pipe the cream cheese frosting onto each cookie cup. Optionally, decorate with sprinkles or red velvet crumbs for extra flair.
- Serve and Store: Serve the cookie cups immediately for best freshness, or store them in an airtight container in the refrigerator for up to 3 days.
Notes
- Ensure the butter and cream cheese are softened at room temperature for easier mixing and a smoother frosting.
- Do not overmix the cookie dough once the dry ingredients are added to keep the texture tender.
- Pressing the dough gently into the muffin tin helps create the perfect cup shape to hold the frosting.
- Use gel-based red food coloring for a more vibrant color without altering the dough’s consistency.
- These cookie cups can be stored in an airtight container in the refrigerator for up to 3 days.


