
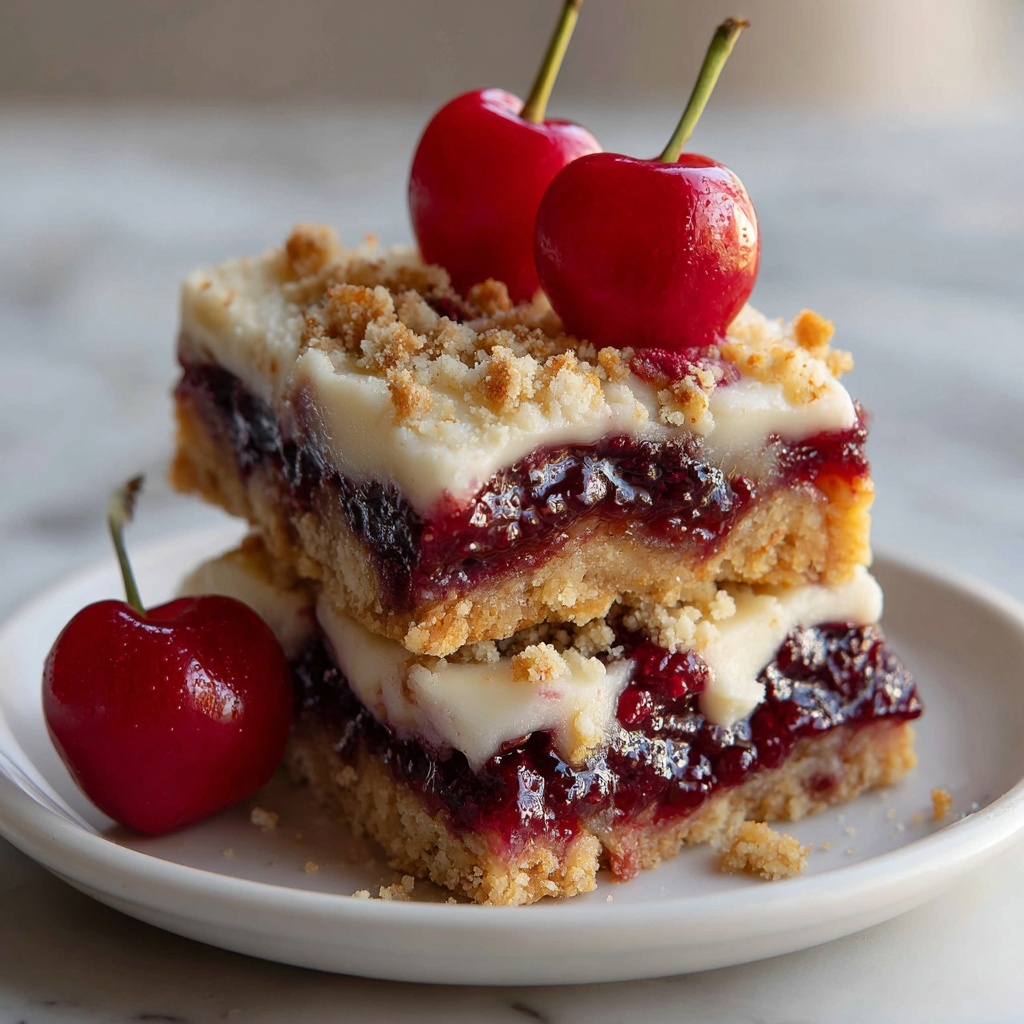
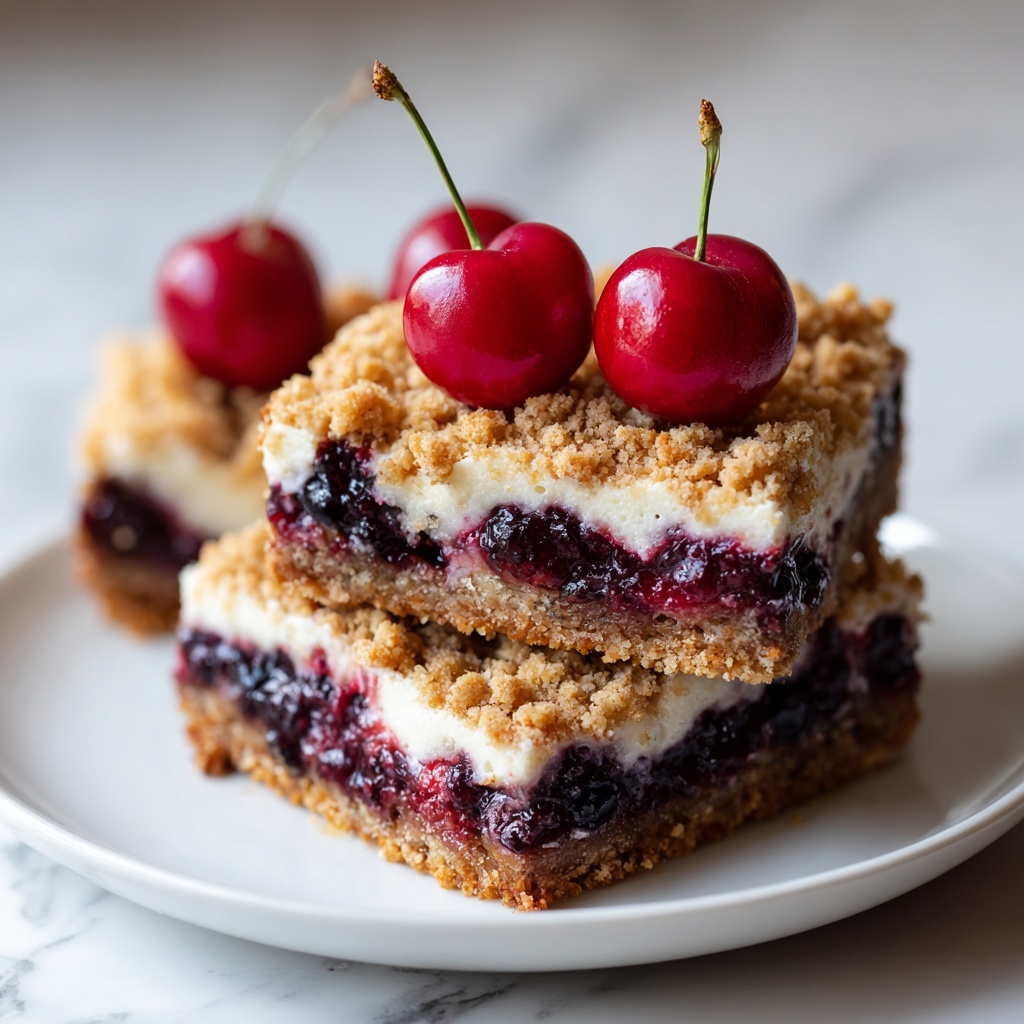
If you’re looking to dazzle your holiday dessert table this year, I have the perfect treat for you: the Christmas Cherry Cheesecake Bars Recipe. These bars combine a buttery sugar cookie crust with a luscious, creamy cheesecake layer and a festive cherry topping, all crowned with a crunchy almond streusel. They’re the perfect balance of sweet, tangy, and nutty flavors in every bite, and they’re remarkably simple to make—even if you’re not usually a baker. Once you try this recipe, it’s sure to become a cherished holiday favorite that everyone asks for year after year.
Ingredients You’ll Need
Each ingredient in this Christmas Cherry Cheesecake Bars Recipe plays a special role, creating the perfect harmony of texture and flavor. From the buttery crust to the tangy cherry topping, these essentials come together effortlessly to make an unforgettable treat.
- Sugar Cookie Mix: Acts as the base of the crust and topping, giving these bars their classic, buttery cookie flavor and crumbly texture.
- Cold Unsalted Butter: Adds richness to the crust and topping, ensuring a tender, melt-in-your-mouth bite—make sure it’s cold for that crumbly texture!
- Softened Cream Cheese: The star of the cheesecake layer, providing that signature creamy and tangy goodness that balances the sweetness perfectly.
- Granulated Sugar: Sweetens the cream cheese filling just right without overpowering the cheesecake’s delicate flavor.
- All-Purpose Flour: A little extra structure for the cheesecake layer, helping it hold together beautifully while baking.
- Vanilla Extract: Enhances all the flavors with a warm, aromatic depth that brings the cheesecake to life.
- Egg: Binds the cheesecake filling together for a smooth, custard-like texture.
- Cherry Pie Filling: The festive and juicy layer that adds tart sweetness and vibrant red color, making this dessert truly perfect for the Christmas season.
- Toasted Sliced Almonds: Provides a delightful crunch and nutty accent that complements the creamy and fruity layers perfectly.
How to Make Christmas Cherry Cheesecake Bars Recipe
Step 1: Prepare Baking Pan
First things first, preheat your oven to 350°F (175°C). Line your baking pan, either 8×8 inches or 9×13 inches depending on how thick you want your bars, with foil. Then spray it with non-stick cooking spray. This setup will make removing the bars a breeze once they have cooled.
Step 2: Make the Crust
In a large bowl, combine the sugar cookie mix and cold unsalted butter. Use a pastry blender or your fingertips to mix until the dough resembles coarse crumbs—this crumbly texture is key for a buttery, tender crust. Reserve about ¾ cup of this mixture for the topping, then press the remainder firmly and evenly into the bottom of your prepared pan. Bake this crust for 10 minutes. It might look slightly underdone when you take it out, but that’s exactly how it should be. Let it cool while you prepare the next layer.
Step 3: Prepare Cheesecake Layer
While your crust cools, mix the softened cream cheese, granulated sugar, all-purpose flour, vanilla extract, and egg in a separate bowl. Beat until the mixture is smooth and creamy with no lumps—this will ensure your cheesecake layer bakes up silky and rich.
Step 4: Assemble Layers
Spread your cheesecake mixture evenly over the cooled cookie crust. Then, gently spoon your cherry pie filling over the cheesecake, spreading it out so you have a nice even layer of those beautiful cherries. The bright cherry topping gives these bars their signature festive flair.
Step 5: Add Topping
Mix the reserved crumbly cookie mixture with the toasted sliced almonds, then sprinkle it evenly over the cherry layer. This topping adds texture and a lovely golden crunch that contrasts the creamy cheesecake beneath.
Step 6: Final Bake
Return your pan to the oven and bake again: about 40 minutes if you’re using the 8×8 pan, or 45 minutes if you opted for the larger 9×13. You’re aiming for a lightly golden top and a cheesecake layer that’s set but still a little soft in the middle.
Step 7: Cool and Store
Once baked, let your bars cool at room temperature for about 30 minutes, then pop them into the refrigerator for a few hours. This chilling step helps the cheesecake layer firm up perfectly, making slicing easier and serving neater. When ready to store, keep the bars covered in the fridge.
How to Serve Christmas Cherry Cheesecake Bars Recipe
Garnishes
To take your Christmas Cherry Cheesecake Bars Recipe to the next level, try garnishing with a light dusting of powdered sugar or a few fresh cherries on top. A drizzle of white chocolate or some extra toasted almonds scattered on the plate can also add gorgeous visual appeal and a burst of flavor.
Side Dishes
These cheesecake bars pair wonderfully with a dollop of freshly whipped cream or a scoop of vanilla bean ice cream. For a festive twist, a cup of hot mulled cider or a rich cup of coffee makes the perfect companion to balance the sweetness of the bars.
Creative Ways to Present
For holiday gatherings, consider cutting the bars into small bite-sized squares and serving them on a festive platter decorated with holly leaves or peppermint candies. Wrapping individual bars in parchment paper tied with a ribbon also makes for a charming edible gift that your guests will love.
Make Ahead and Storage
Storing Leftovers
Keep any leftover Christmas Cherry Cheesecake Bars Recipe tightly wrapped or stored in an airtight container in the refrigerator. They’ll stay fresh and delicious for up to 4 days. The flavors actually deepen after a day or so, so leftovers can be just as enjoyable as fresh out of the oven!
Freezing
If you want to extend the shelf life or prepare ahead, you can freeze the cheesecake bars. Wrap them tightly in plastic wrap and then in foil before placing them in the freezer. Frozen bars maintain their taste and texture for up to 2 months—just allow them to thaw overnight in the fridge before serving.
Reheating
Since these bars are best enjoyed chilled, there’s no need to reheat. However, if you prefer to serve them slightly warmed, pop them in the microwave for about 10 seconds or the oven at low heat for a few minutes, but be careful not to melt the cherry topping or soften the cheesecake too much.
FAQs
Can I use fresh cherries instead of cherry pie filling?
Absolutely! Fresh cherries can be delicious, but you’ll want to cook them down with a little sugar and cornstarch to create that classic pie filling consistency. This ensures your topping isn’t too runny and holds up well on the bars.
What if I don’t have sugar cookie mix on hand?
If you can’t find sugar cookie mix, you can substitute with your favorite buttery cookie or cake mix, or even make a simple shortbread crust from scratch. Just keep the same ratio of flour and butter for the best texture.
Can I make these bars gluten-free?
Yes! Use a gluten-free sugar cookie mix and gluten-free all-purpose flour in your cheesecake filling. Make sure the cherry pie filling is free of gluten-containing ingredients too. This way, everyone can enjoy these festive bars.
How thick should I press the crust?
Press the crust evenly and firmly into the bottom of your pan, about ¼ to ½ inch thick. This ensures it holds the cheesecake layer well without becoming too thin or crumbly.
Why do I need to chill the bars after baking?
Chilling the bars allows the cheesecake layer to set properly, making it easier to cut clean bars and enhancing the creaminess. It also helps all the layers meld together giving you that perfect holiday dessert experience.
Final Thoughts
This Christmas Cherry Cheesecake Bars Recipe is truly a holiday gem—easy to prepare, visually stunning, and packed with delightful flavor and texture. Whether you’re bringing it to a party or savoring it by the fire with loved ones, these bars will not disappoint. I can’t wait for you to try them and see how quickly they become your go-to festive dessert each year!
Print
Christmas Cherry Cheesecake Bars Recipe
- Prep Time: 15 minutes
- Cook Time: 50 minutes
- Total Time: 1 hour 15 minutes
- Yield: 16 servings
- Category: Dessert
- Method: Baking
- Cuisine: American
Description
Delightful Christmas Cherry Cheesecake Bars featuring a buttery sugar cookie crust, creamy cheesecake layer, sweet cherry pie filling, and a crunchy toasted almond topping. Perfect for festive gatherings and holiday celebrations.
Ingredients
Crust
- 8.5 ounces Sugar Cookie Mix
- 4 tablespoons Cold Unsalted Butter
Cheesecake Layer
- 8 ounces Softened Cream Cheese
- ¼ cup Granulated Sugar
- 1 tablespoon All-Purpose Flour
- ½ teaspoon Vanilla Extract
- 1 large Egg
Topping
- ½ can Cherry Pie Filling
- ⅓ cup Toasted Sliced Almonds
- Reserved crumbly cookie mixture (about ¾ cup)
Instructions
- Prepare Baking Pan: Preheat the oven to 350°F (175°C). Line an 8×8-inch or 9×13-inch baking pan with foil and lightly coat it with non-stick spray to prevent sticking.
- Make the Crust: In a large bowl, combine the sugar cookie mix and cold unsalted butter. Use a pastry blender to mix until the mixture becomes crumbly. Reserve about ¾ cup of this crumbly mixture for the topping. Press the remaining crumbs firmly into the bottom of the prepared pan to form the crust. Bake for 10 minutes and let it cool; the crust may look slightly underbaked but will finish cooking later.
- Prepare Cheesecake Layer: While the crust cools, in a separate bowl, blend the softened cream cheese, granulated sugar, all-purpose flour, vanilla extract, and egg until the mixture is smooth and creamy.
- Assemble Layers: Spread the cream cheese mixture evenly over the cooled sugar cookie crust. Carefully spoon the cherry pie filling evenly over the cream cheese layer, ensuring good coverage without mixing layers.
- Add Topping: Combine the reserved crumbly cookie mixture with the toasted sliced almonds in a small bowl. Sprinkle this mixture evenly over the cherry pie filling layer to add a crunchy finish.
- Final Bake: Place the pan back in the oven and bake for 40 minutes if using an 8×8-inch pan or 45 minutes if using a 9×13-inch pan until the topping is lightly golden brown.
- Cool and Store: Remove from the oven and allow the bars to cool at room temperature for 30 minutes. Then, chill them in the refrigerator for a few hours until set. Store the bars in the refrigerator covered to maintain freshness.
Notes
- Using cold butter in the crust is essential for the crumbly texture.
- Allow the bars to chill adequately for easier slicing.
- These bars can be stored in the refrigerator for up to 4 days.
- For an extra festive touch, consider drizzling melted white chocolate over the cooled bars before serving.
- Use foil with an overhang for easier removal of bars from the pan.
