
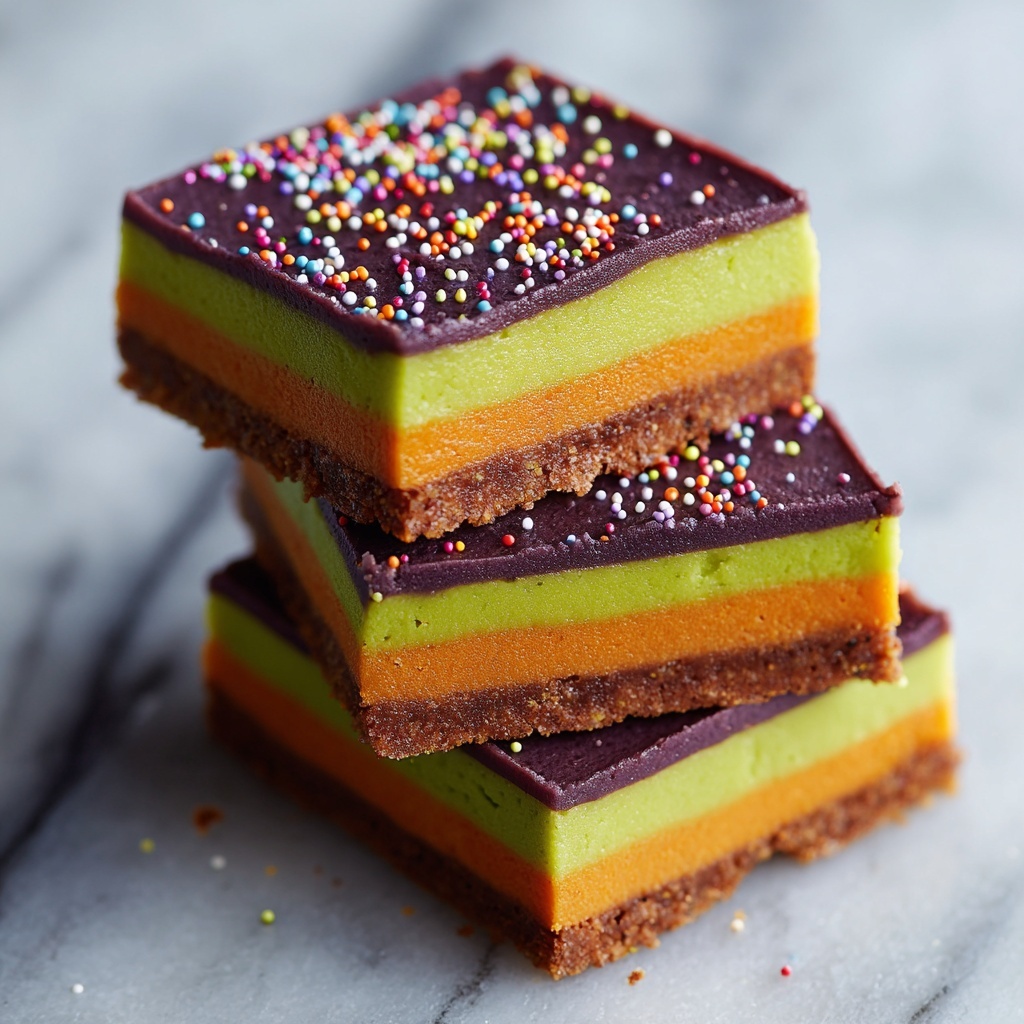
If you have a soft spot for delightful, colorful, and irresistibly tasty treats, you are going to adore this Rainbow Cookies Recipe. These classic, tri-layer almond cakes bring together vibrant red, green, and natural layers separated by luscious apricot jam and coated in smooth chocolate. Every bite delivers a perfect balance of tender cake, subtle almond essence, fruity sweetness, and rich chocolate that feels like a celebration for your taste buds. Whether you’re baking for a holiday, special occasion, or just because, these Rainbow Cookies will brighten your kitchen and your day.
Ingredients You’ll Need
These ingredients are wonderfully straightforward yet essential, creating the perfect texture, flavor, and appearance for your Rainbow Cookies Recipe. Each component plays its part—from the silky almond paste to the colorful gel food coloring, sweet apricot jam, and decadent chocolate coating.
- Unsalted butter (3 sticks, 12 ounces): Softened to room temperature to ensure a smooth, creamy batter that bakes up tender.
- Cooking spray: For greasing the pans to help your delicate cakes release perfectly.
- Almond paste (7 ounces): Adds that signature rich almond flavor and moist, dense crumb that makes these cookies so special.
- Granulated sugar (1 1/4 cups): Sweetens the batter just right, balancing the nutty notes of almond paste.
- Kosher salt (1/2 teaspoon): Enhances all the flavors and keeps the sweetness from feeling flat.
- Large eggs (4): Bind and enrich the batter, giving it a tender but sturdy structure.
- Almond extract (2 teaspoons): Amplifies the almond essence with a fragrant, nutty aroma that’s unmistakable.
- All-purpose flour (2 cups): Provides the base for these delightful rainbow layers while keeping the texture soft yet sliceable.
- Red gel food coloring: For a gorgeous, vibrant salmon-pink layer that catches the eye and excites the palate.
- Green gel food coloring: Adds a bright, festive pop of color that contrasts perfectly with the other layers.
- Apricot jam (1 cup, divided): Acts as the sweet, fruity layer between cakes, sealing in moisture and flavor beautifully.
- Semi-sweet chocolate chips (1 1/2 cups): Melted into a luscious coating that transforms these layered cakes into elegant, bite-sized treats.
How to Make Rainbow Cookies Recipe
Step 1: Prepare the Ingredients and Pans
Begin by softening your butter at room temperature for about an hour to create a creamy base for your batter. While waiting, preheat your oven to 350°F and arrange two racks in the middle and upper positions for even cooking. Grease three 9×13-inch baking pans generously with cooking spray and line them with parchment paper, leaving extra overhang for easy cake removal once baked.
Step 2: Make the Batter
In a large mixing bowl, crumble the almond paste into the softened butter, then add sugar and kosher salt. Cream these together using the paddle attachment on a medium speed until the mixture becomes smooth and luscious, about five minutes. Next, beat in the eggs and almond extract until fully combined, giving your batter rich flavor and perfect consistency. Finally, fold in the flour on low speed just until everything comes together; be careful not to overmix to keep your cakes tender.
Step 3: Divide and Color the Batter
Split your batter evenly into three separate bowls. Add five drops of red gel food coloring to one bowl and mix until you achieve a deep salmon-pink shade—feel free to adjust for vibrancy. To another bowl, add five drops of green gel food coloring, blending until bright and festive. Leave the third bowl plain, showcasing the natural almond-vanilla color for your undyed layer.
Step 4: Bake the Rainbow Layers
Evenly spread each colored batter into the prepared pans with a small offset spatula—it doesn’t have to be perfectly smooth, since the layers will be stacked. Bake each pan for 10 to 14 minutes, rotating halfway through to ensure even baking. Your ovens may vary, so watch for dry tops without browning. Once baked, cool the cakes completely on wire racks—placing the pans briefly in the fridge or freezer can speed this up.
Step 5: Assemble Your Rainbow Cookie Layers
Place the green cake layer on a large cutting surface and spread half of your apricot jam evenly over it. Peel off the parchment from the undyed layer and place it atop the green layer, spreading the remaining jam evenly. Next, add the pink layer on top. Cover the stacked cakes with parchment and gently weigh down with a baking sheet and cans to compress the layers—a crucial step for that classic dense texture. Refrigerate for two hours or overnight for best results.
Step 6: Add the Chocolate Coating
Microwave your semi-sweet chocolate chips in a microwave-safe bowl in 30-second bursts, stirring between each, until nearly melted. Stir until smooth and glossy. Carefully remove your chilled cake stack from the fridge, take off the weight and parchment, and trim edges to create even, polished sides. Spread the melted chocolate evenly over the top and sides, wrapping your Rainbow Cookies Recipe in a rich, chocolatey embrace. Allow the chocolate to set in the refrigerator for about 30 minutes.
Step 7: Slice and Serve
For neat, clean cuts, dip a sharp chef’s knife in hot water, dry it, and slice your cake into 2-inch squares. Warming and drying the knife between cuts prevents any cracking in the chocolate, letting you serve perfect rainbow bites that will impress every guest.
How to Serve Rainbow Cookies Recipe

Garnishes
While the Rainbow Cookies are showstoppers on their own, you can amp up the presentation with a light dusting of powdered sugar or a few slivered almonds placed atop each square. A delicate touch like this adds texture and an elegant flair without stealing the spotlight from those beautiful layers.
Side Dishes
Serve these with a nice cup of coffee, tea, or even a glass of chilled dessert wine for a sophisticated treat time. Fresh berries can also complement the fruity apricot jam and almond flavors, adding brightness and balance to your serving plate.
Creative Ways to Present
Consider arranging the cookies in vibrant stacks or on a tiered dessert stand to highlight their colorful layers. For festive occasions, place individual squares in paper cupcake liners or wrap them in clear cellophane tied with a colorful ribbon—perfect for gifting or party favors.
Make Ahead and Storage
Storing Leftovers
Once cooled and coated in chocolate, store your Rainbow Cookies in an airtight container in the refrigerator. They keep beautifully for up to five days, staying moist and delicious as the layers continue to meld and the chocolate remains firm but tender.
Freezing
Rainbow Cookies freeze well and can be kept in an airtight container or wrapped tightly in plastic wrap and foil for up to two months. When ready to enjoy, thaw them in the refrigerator overnight to maintain their texture and flavor.
Reheating
These cookies are best served cool or at room temperature, but if you prefer a slightly softer chocolate coating, let them sit at room temperature for about 15 minutes before serving. Avoid microwaving, as it can melt and ruin the texture of the chocolate shell.
FAQs
Can I use food coloring other than gel?
You can use liquid food coloring, but gel is recommended because it provides more vibrant colors without altering the batter’s consistency.
Is almond paste necessary for the recipe?
Yes, almond paste gives the cookies their signature flavor and moist texture that other substitutes can’t replicate quite as well.
Can I make Rainbow Cookies without chocolate coating?
Absolutely! They’re delicious on their own or dusted with powdered sugar, but the chocolate adds a beautiful finishing touch and flavor contrast.
How thick should each cake layer be?
Each layer should be baked in a 9×13-inch pan with about an even thickness, usually around a half inch, to achieve the classic layered look when stacked.
What’s the best way to cut the Rainbow Cookies?
Use a sharp knife warmed in hot water, wiped dry between cuts, to prevent cracking the chocolate coating and to create clean squares.
Final Thoughts
This Rainbow Cookies Recipe is truly a treasure to have in your baking repertoire. Its vibrant layers, almond richness, and chocolate coating offer both a feast for the eyes and pure joy for the palate. Whether it’s a festive gathering or a cozy afternoon snack, these cookies bring warmth, color, and happiness easily to your table. I hope you’ll give this recipe a try and fall in love with the magic of rainbow cookies just like I have!
Print
Rainbow Cookies Recipe
- Prep Time: 1 hour 15 minutes
- Cook Time: 14 minutes
- Total Time: 2 hours 15 minutes
- Yield: 32 servings
- Category: Dessert
- Method: Baking
- Cuisine: Italian-American
Description
This colorful Rainbow Cookies recipe features delicate almond-flavored layers in red, green, and white, baked to perfection and layered with smooth apricot jam. The cake is finished with a luscious semi-sweet chocolate coating for a delightful treat that’s perfect for holidays or special occasions.
Ingredients
For the Batter
- 3 sticks (12 ounces) unsalted butter, softened
- 7 ounces almond paste
- 1 1/4 cups granulated sugar
- 1/2 teaspoon kosher salt
- 4 large eggs
- 2 teaspoons almond extract
- 2 cups all-purpose flour
- Red gel food coloring
- Green gel food coloring
For Assembly
- 1 cup smooth apricot jam, divided
- Cooking spray
- Parchment paper
For Chocolate Coating
- 1 1/2 cups semi-sweet chocolate chips (about 8 ounces)
Instructions
- Prepare Ingredients: Soften 3 sticks of unsalted butter at room temperature for about 1 hour until it becomes pliable and ready for mixing.
- Preheat Oven: Arrange two oven racks in the middle and upper positions, then preheat the oven to 350°F to ensure even baking of the layers.
- Prepare Baking Pans: Spray three 9×13-inch baking pans or quarter sheet pans with cooking spray and line each with parchment paper, leaving a 2-inch overhang on two sides to easily remove the baked layers later.
- Make the Batter: Crumble almond paste into a mixing bowl with the softened butter, then add granulated sugar and kosher salt. Use a paddle attachment to mix on medium speed until smooth, about 5 minutes.
- Add Eggs and Flavor: Add the eggs and almond extract to the butter mixture and blend on medium speed until fully combined, approximately 2 minutes.
- Incorporate Flour: Add all-purpose flour to the bowl and mix on low speed until just combined. Scrape down the bowl sides as necessary to ensure even mixing.
- Divide and Color Batter: Split the batter evenly into three separate bowls. Add red gel food coloring to one bowl and mix until it becomes a deep salmon pink. Add green gel food coloring to another bowl until bright green. Leave the third bowl plain for the white layer.
- Bake the Layers: Spread each colored batter evenly into the prepared pans using an offset or rubber spatula. Bake for 10 to 14 minutes, rotating pans halfway through, until the tops are dry but not browned.
- Cool Layers: Remove pans from oven and cool cakes completely on wire racks for about 45 minutes. For faster cooling, place the pans in the refrigerator or freezer briefly.
- Assemble Cake: Place the green layer on a cutting board, spread 1/2 cup apricot jam evenly over it, then layer the plain cake on top and spread the remaining apricot jam. Finish by placing the pink layer on top.
- Press and Chill: Cover the stacked cake with parchment paper, place a baking sheet on top, and weigh down with cans. Refrigerate for at least 2 hours or overnight to allow the layers to set.
- Melt Chocolate: Microwave semi-sweet chocolate chips in a microwave-safe bowl in 30-second intervals, stirring between, until melted and smooth, about 90 seconds total.
- Trim Edges: Remove the top parchment, cans, and baking sheet. Trim cake edges with a sharp knife for evenness, saving scraps for snacking or serving.
- Coat with Chocolate: Spread melted chocolate evenly over the top and sides of the cake using an offset spatula.
- Set Chocolate: Refrigerate the cake until the chocolate hardens, about 30 minutes.
- Slice and Serve: Dip a chef’s knife in hot water, dry it, then cut the cake into 2-inch squares, warming and drying the knife between cuts to prevent the chocolate from cracking.
Notes
- Soften butter well in advance for easier mixing and better batter texture.
- Gel food coloring provides vibrant colors without affecting batter consistency.
- Using parchment overhangs creates an easy way to lift cake layers out of the pans without damage.
- Chilling the assembled cake ensures cleaner slices and helps the layers meld together perfectly.
- Warm the knife between cuts to maintain smooth clean chocolate edges.
- Save trimmed scraps for a delicious snack or crumble over ice cream for added texture.


