
The Homemade Energy Bars Packed with Strength and Energy Recipe is your new best friend for a quick, nourishing boost anytime you need it. Imagine a perfect blend of roasted nuts, seeds, dates, and honey coming together to create bars that are not only delicious but also loaded with nutrients to power your day. Whether you’re gearing up for a workout, a long hike, or just a busy afternoon, these energy bars are incredibly satisfying and a total game changer for homemade snacks.

Ingredients You’ll Need
Gathering the right ingredients is simpler than you think, and each one plays an important role in making these energy bars both tasty and wholesome. From the crunch of roasted nuts to the natural sweetness of dates and honey, these ingredients combine for a perfect balance of strength and flavor.
- Cashews (70g, ½ cup): Adds a creamy texture and mild flavor that balances the nutty mix.
- Walnuts (70g, ½ cup): Provides a rich, slightly earthy taste and healthy fats.
- Almonds (70g, ½ cup): Brings a crunchy bite and boosts protein content.
- Pine nuts (40g, ¼ cup): Offers a subtle buttery flavor that enhances the overall nutty profile.
- Hazelnuts (70g, ½ cup): Gives a distinct, aromatic taste and texture variety.
- Pumpkin seeds (70g, ⅓ cup): Adds an extra crunch and a punch of minerals like magnesium.
- Dates, pitted (150g, 1 cup): Natural, sticky sweetness that helps bind the bars together.
- Oatmeal (50g, ½ cup): Brings body and a hearty texture, plus fiber to keep you full.
- Olive oil (3 tablespoons): Helps soften the mixture and adds subtle richness.
- Salt (½ teaspoon): Balances sweetness and enhances overall flavor.
- Honey (160ml, ½ cup): Natural sweetener and binding agent full of wholesome goodness.
How to Make Homemade Energy Bars Packed with Strength and Energy Recipe
Step 1: Roast the Nuts
Start by warming a dry frying pan over medium heat. Toss in the cashews, walnuts, almonds, pine nuts, and hazelnuts. Stir frequently as they toast evenly until fragrant and edges turn golden. This roasting unlocks deep nutty flavors that make the bars irresistible. Once done, set them aside to cool.
Step 2: Roast the Pumpkin Seeds
In the same pan, add the pumpkin seeds and roast for a few minutes until they begin popping. This small step adds texture and a delightful toasted nuttiness that complements the other nuts perfectly.
Step 3: Soften the Dates
Place your pitted dates in cold water and let them soak for about 15 minutes. This softens them for easier chopping and smoother incorporation, essential for that chewy, luscious texture.
Step 4: Prepare the Dates
Drain the dates, pat them dry if needed, and chop into small pieces. Smaller chunks ensure the dates mix well with the nuts and oats without overwhelming each bite.
Step 5: Pulse the Oats
Give the oatmeal a quick pulse in a food processor until you have a finer texture but still retain a little bit of graininess. This helps the oats blend smoothly with the rest of the ingredients while keeping some hearty texture.
Step 6: Cook Dates with Olive Oil
Heat 3 tablespoons of olive oil in your frying pan over medium heat, then add the chopped dates. Stir them often for about 5 minutes until they soften further and start to break down, forming a sticky base for the bars.
Step 7: Mix in Nuts, Seeds, and Oats
Combine the roasted nuts, pumpkin seeds, and pulsed oats with the softened dates in the pan. Stir well so every bite is packed with a crunchy, chewy mix that feels indulgent yet nourishing.
Step 8: Add Salt and Honey
Sprinkle in the salt to enhance all the flavors, and pour in the honey. Stir gently and avoid heating too long to keep honey’s natural enzymes intact. This sweet, binding syrup holds everything together perfectly.
Step 9: Press the Mixture
Line a baking dish or mold with parchment paper that has a light brush of olive oil. Transfer the mixture into the dish, pressing firmly with the back of a spoon or your hands to create a well-packed, even layer. This shaping step is key for bars that hold together nicely later.
Step 10: Chill and Cut
Let the bars cool at room temperature before refrigerating for an hour. After firming up, use a wet knife to slice into twelve bars. Return to the fridge for an additional 30 minutes to fully set and reach perfect bar texture.
Step 11: Wrap and Store
Wrap each bar tightly in cling film for easy portability and freshness. These energy bars are your trusty companion for busy days, long workouts, or whenever you need a quick hit of strength and energy.
How to Serve Homemade Energy Bars Packed with Strength and Energy Recipe

Garnishes
If you want to give your bars an extra touch before serving, sprinkle some sea salt, drizzle melted dark chocolate, or toss on additional chopped nuts atop for a fancy finish that makes snacking feel special.
Side Dishes
Pair these energy bars with a fresh fruit salad or a creamy Greek yogurt to create a well-rounded snack that covers all your nutritional bases while being satisfyingly delicious.
Creative Ways to Present
Wrap bars individually in parchment paper tied with twine for an inviting homemade gift. Or cut into smaller bite-sized pieces to create a snack platter perfect for sharing during picnics or gatherings.
Make Ahead and Storage
Storing Leftovers
Keep your energy bars refrigerated in an airtight container or wrapped individually in cling film. They stay fresh and chewy for up to a week, giving you plenty of ready-to-eat snacks without any hassle.
Freezing
If you want to extend their shelf life, freeze the bars wrapped tightly. They freeze beautifully for up to three months. Just thaw them in the fridge or at room temperature before enjoying.
Reheating
If you prefer a slightly warm bar, especially during colder months, microwave for 10 to 15 seconds or leave at room temperature until soft. Reheating releases the beautiful aroma of honey and toasted nuts, making the experience even more delightful.
FAQs
Can I substitute nuts if I have allergies?
Absolutely! You can swap out nuts for seeds like sunflower or chia seeds or use a combination of safe ingredients. Just keep in mind these changes might alter the texture or flavor slightly.
Are these bars suitable for vegan diets?
The classic recipe uses honey, which some vegans avoid. You can replace honey with maple syrup or agave nectar to keep it plant-based without sacrificing sweetness or binding properties.
How long do homemade energy bars last?
When stored properly in the refrigerator, they can last up to one week. For longer storage, freezing is a great option and keeps them fresh for up to three months.
Can I make these bars gluten-free?
Yes! Use certified gluten-free oats to keep the bars gluten-free while maintaining their hearty texture and taste.
Is it possible to add other flavorings?
Definitely. Feel free to add cinnamon, vanilla extract, or a pinch of cocoa powder to customize your bars to your liking. These additions can add wonderful depth and warmth.
Final Thoughts
This Homemade Energy Bars Packed with Strength and Energy Recipe is truly a standout snack that feels like a hug for your body and soul. It’s simple enough to whip up any time but rich enough in flavor and nutrients to keep you energized for hours. Give it a try—you’re going to wonder how you ever got through the day without it!
Print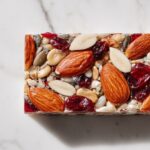
Homemade Energy Bars Packed with Strength and Energy Recipe
- Prep Time: 10 minutes
- Cook Time: 15 minutes
- Total Time: 25 minutes
- Yield: 12 servings
- Category: Snack
- Method: Frying
- Cuisine: International
- Diet: Vegetarian
Description
These Homemade Energy Bars are packed with a variety of nuts, seeds, dates, and oatmeal, offering a perfect blend of strength and sustained energy. Roasted nuts and seeds combined with naturally sweetened dates and honey create a nutritious snack ideal for on-the-go fueling or a wholesome treat.
Ingredients
Nuts and Seeds
- 70g (½ cup) cashews
- 70g (½ cup) walnuts
- 70g (½ cup) almonds
- 40g (¼ cup) pine nuts
- 70g (½ cup) hazelnuts
- 70g (⅓ cup) pumpkin seeds
Other Ingredients
- 150g (1 cup) dates, pitted
- 50g (½ cup) oatmeal
- 3 tablespoons olive oil
- ½ teaspoon salt
- 160ml (½ cup) honey
Instructions
- Roast the Nuts: In a dry frying pan, lightly roast the cashews, walnuts, almonds, pine nuts, and hazelnuts over medium heat for a few minutes until they become fragrant and slightly golden. Remove them from heat and set aside.
- Roast Pumpkin Seeds: In the same pan, roast the pumpkin seeds for a few minutes until they start popping. Once done, set aside.
- Soften Dates: Soak the dates in cold water for 15 minutes to soften them, making them easier to process.
- Prepare Dates: Drain the soaked dates, remove pits if any remain, and chop them finely into small pieces.
- Process Oatmeal: Use a food processor or mixer to pulse the oatmeal until it achieves a finer texture while leaving small pieces for added texture.
- Heat Olive Oil: In a frying pan, heat 3 tablespoons of olive oil over medium heat, preparing to soften the dates further.
- Cook Dates: Add the chopped dates to the heated pan and cook, stirring frequently for about 5 minutes until they soften and start to break down.
- Mix Nuts and Oatmeal: Add the roasted nuts, pumpkin seeds, and processed oatmeal to the softened dates in the pan. Stir thoroughly to combine all ingredients evenly.
- Add Salt and Honey: Stir in ½ teaspoon of salt and pour in 160ml of honey. Mix everything together carefully, avoiding prolonged heating of the honey to preserve its nutrients.
- Prepare Molding Dish: Line a baking dish or mold with parchment paper greased with olive oil, or use siliconized parchment paper for easier removal of the bars.
- Form Bars: Press the mixture firmly into the prepared dish using the back of a spoon or your hands, ensuring the surface is even and compacted.
- Cool and Refrigerate: Let the mixture cool at room temperature, then refrigerate for 1 hour to allow the bars to firm up completely.
- Cut into Bars: After chilling, use a wet knife to cut the mixture into individual bars cleanly and neatly.
- Final Chill: Return the cut bars to the refrigerator for an additional 30 minutes to fully set.
- Storage: Wrap each energy bar individually in cling film for easy storage and portability. Keep refrigerated to maintain freshness or freeze for longer shelf life.
Notes
- Use siliconized parchment paper if available to prevent sticking and ease removal of bars from the mold.
- Do not overheat honey during mixing to retain its natural nutrients and flavor.
- Press the bar mixture firmly to ensure the bars hold together when cut and handled.
- Chilling times are crucial for texture and firmness; do not skip refrigeration steps.
- For variation, you can substitute some nuts or seeds according to preference or dietary needs.
- Store bars wrapped in cling film in an airtight container for best freshness.


